Tuesday, August 5, 2014

See some old friends

Took the day off and went to see some old friends. Just like in this song, it is good for the soul. Stopped in at the old workplace and saw some folks. Had a coffee. Shot the shit etc. Going to have to do that again soon! :-)


So with lots of time on my hands to think I keep looking back at all the work that went into the outside of the hull. I really cant fathom that I actually did all that. It seems kind of surreal in that I don't remember doing half of it! ;-)  Back to the thinking part. I have tinkered with 'Vacuum Resin Infusion' method of making small fiberglass parts. A few years ago I tinkered together a fiberglass on foam cover for our sump pump hole. The cats kept knocking stuff in there gumming up the pump switch.
The whole process is pretty simple. You cover the core (styrofoam) with fiberglass. Enclose the whole thing in a plastic bag, apply a vacuum at one end and resin inlet at the other end. The resin 'infuses' the part leaving you with an ideal resin to fiberglass ratio. The whole process is pretty clean (if you don't spill the resin on the basement floor) (and especially don't just drag an old carpet over it to cover it up). :-)
There's a wee bit more to it than that but you get the idea. You keep the vacuum on the part till the resin cures then you remove the plastic film etc. and you have a perfect part.
Repeat the whole process again and you have the part that appears in the first picture above. Anyhow, what's all this got to do with building a boat. Well resin infusion techniques have been used in boat building for ohhhhhhh 15 yrs or so now, maybe longer and today it's almost the industry standard for new boat construction. Here's a quick example.


The benefits are:
  1. Dry layup of reinforcements
  2. Lighter & stronger composite structures
  3. Tighter control of the production environment
  4. More environmentally friendly (no solvents etc. enter the atmosphere)
  5. and most importantly, NO FRIGGING SANDING! :-)
I'm sure there's others I just can't think of them right now. As to the downsides:
  1. More technically challenging
  2. Expensive consumables (that don't become part of the structure)
  3. Resin is generally more expensive
  4. When it goes wrong, it really goes wrong!
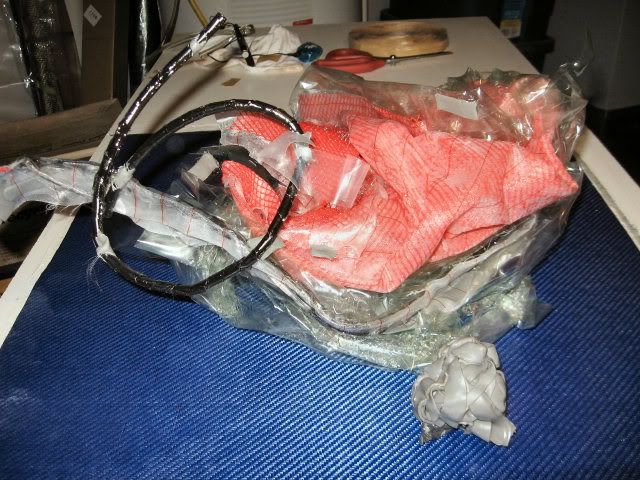
Here's the consumables that get thrown away for just that little part in the picture above.
I don't think any of it is recyclable. Not around here anyways. This is probably the single most important factor that keeps me from using the infusion method more but after all the work that went into the outside of the hull I'm starting to reconsider it again. I know the inside of the boat is too big for just me to get all the layers of fiberglass on 'wet on wet' (the ideal method) so I'm considering infusing the inside.

I have the equipment (except a backup vacuum pump) and I've watched just about every Youtube video of the process being used on boat construction and read every forum & blog about resin infusion. I'm pretty sure I can scale up my experiences to do the inside of the hull. It'll take some balls & patience but I'm sure I can do it. I sat down tonight to crunch some numbers to see what it'll cost. Here's what I came up with so far.


The top part of the spreadsheet is me figuring out the surface area to be covered and the weights of the fabric that will go on each. If I'm assuming a 50/50 glass to resin ratio (pretty good) I'll need approx. 16 gallons of epoxy. I'm pretty sure I used almost 50 gallons on the outside of the hull. :-( A lot of which got sanded back off to fix my mistakes.

You can see the single biggest cost is the resin itself. I've looked far and wide to locate the best price on epoxy resin suitable for infusion. The consumables are actually a much smaller percentage of the overall cost than I expected. :-)  When you consider this is a lot less than half of what I figure it cost me to do the outside of the hull and there's no sanding or wasted resin or messes to clean up it actually makes some considerable economic sense. The downside is I'll have to wait till next spring to actually do it. Ideal weather (temperature) conditions are very important to the process and I don't expect I'll have enough saved up to buy the resin & consumables before spring anyways.

So to get the through the rest of this year there's these things to do:
  1. Sand the keel
  2. Paint the keel with anti-fouling
  3. Flip the boat over
  4. Fill the kerfs in the bototm panel
  5. Sand the inside seams, fillet & tape them
  6. Fix the shed roof.
That's it. That's all that will get done this year. I'll have to find another hobby!  :-)

Standby...

Monday, August 4, 2014

Just a lil' bit more

That's it. Hull is primed. Two coats on absolutely everything plus an extra coat on the transom and bow. I'm done with primer. Terribly messy stuff to work with. I was sort of hoping the paint sprayer would eliminate a lot of the work but that didn't work out as planned. :-(  Oh well, it is what it is. I figure it took me 20 hrs to get both coats on over 4 days. This morning's session was only a couple of hours. I used up all the paint. Four gallons in total.

Rest of today I'm going to organize my hardware etc. for the Gin Pole. Have to move some stuff around and start digging the hole for the pole. Might even start rigging the pole. Dunno yet. My hands are killing me again. Maybe it is time to get sanding again! ;-)

Taking tomorrow off to let the primer firm up then I'll lightly sand the keel & bottom panels for anti-fouling. Hopefully that'll go a lot quicker.

Standby.

Sunday, August 3, 2014

I lost that round

I'd call today's challenge a loss. It started out warm in the shed and only got hotter. I was trying to get the last coat of primer on the hull in time to overcoat it with the anti-fouling. It didn't work. The high temps meant a lot less time to work with the primer before it kicked off in the paint tray. I scrambled as best I could but was just burning myself out and making a mess so I called it quits.

I did however get the a few more panels covered, keel is done, stbd side has it's second coat etc. I've got enough primer left to finish the second coats of the bottom panels with maybe a little left over. I'll save that just 'in case'.

I know it's hard to tell from the pics but I'm really happy with how well it turned out. I learned a lot doing it and hopefully those lessons will stick in my feeble brain so that when it's time to do the topsides (that everyone will see) it'll turn out even better.
I wore my lucky LPBC (Laughing Polar Bear Club) ballcap. This was given to me by a fellow boat builder, Peter Lenihan. The caps are instilled with mystical powers to aid the boat builder. Apparently I haven't appeased the Boat Building Gods 'cause the lucky cap sure let me down today!  ;-)
Those of you familiar with the LPBC will no doubt know what I'm talking about. The rest of you will just think I'm crazy. That's Ok, I won't argue the point!  ;-)

Besides there being a lot of real estate to cover with the primer and a much smaller time window to overcoat it with the heat my hands were killing me today. This carpal tunnel syndrome is no joke. The pain is intense and the 'pins & needles' is hugely annoying. You drop stuff a lot. It's also kind of weird, it never really bugged me that much when I was sanding all the time! Go figure.

So now that I know I can't hot coat the anti-foul paint I've consigned myself to having to sand the keel & bottom at least one more time. Oh joy! I don't think it's that big of a deal. It'll allow me to get the job done at a leisurely pace and lesson the chance of any more screw ups.

We often wondered where the Baby cat went when she takes off during the day. Today I found her nestled under the boat laying on a plastic garbage bag covered in sanding dust. Doh!


That's it for today. More fun & games coming tomorrow.

Standby..


Saturday, August 2, 2014

Pretty in Primer

Today's mission was to finish getting the first whole coat of epoxy primer on the hull.
Took me just about 3-1/2 hrs to roll on the bottom panels & keel plus one more coat on the port side.
Here's an odd view! I couldn't get the bow in because of the extension on the shed.
So by my count the hull has:

2 coats on the port side
2 coats on the transom
2 coats on the keel bottom
1 coat on the stbd side
1 coat on the port & stbd bottom panels
1 coat on the keel sides

I have one gallon of primer left. That should be exactly enough to get two coats on everything. Mfgr recommended 4 coats but I just can't swing it right now. It'll have to do. I'm not going to paint the sides right away. That'll likely be one of the last things done before the boat leaves the shed. If they need more primer they'll get it then.

Right after I roll the last coat on the keel I have to wait till it's tacky but not sticky (thumbprint test) and then I'll roll on the anti-fouling bottom coat. Tonight I'll go out with the laser level and mark the water line.

Oh boy I'm tired. That was all done from the step ladder so there was a lotta ups & downs going on.

Beer O'Clock!  But I got none. :-(


Friday, August 1, 2014

Let there be paint

even if it is primer. Thank Gawd it's not BLUE either! :-)

I decided awhile back to give this Bluewater Marine epoxy paint a try. It's $40 cheaper than the Interprotect 2000 I've used in the past. It's also a barrier coat like Interprotect.
 
I figured this would be the time to try learning to spray paint as well and bought an HVLP sprayer from TCPGlobal on eBay. It has the 2.0 venturi nozzel specifically for heavy epoxy primers.
It took me an hour and a half this morning to wipe the whole boat down with acetone to remove any oil, wax or grease from the hull just before I started painting. Started mixing the paint and made a helluva mess as you can see in the top pic! ;-) Doh! I knew this heavy primer would have a lot of solids in it and used a paint mixer on my cordless drill. Didn't know it'd fly out all over the goddam place! *ugh* Anywho, got that cleaned up and paint mixed. It has a 15 min induction time before you can start applying it.

Now I've never really spray painted anything like this before so I knew there would be a bit of a learning curve. Youtube provided some good tips on how to setup the gun and spray pattern. I did notice the spray pattern was really small and there was nothing I could do to change it. I figured it was the heavy primer that was causing it. I started on the transom.
If you look close you can see some tiger striping. The spray pattern wasn't much more than 2-1/2" so with overlap I was getting about 1-1/2" per pass. It took forever to get the transom and half the port hull side done. Almost 2-1/2 hours later I had to stop for lunch.

I thought I had cleaned the paint gun well enough when I stopped but that wasn't the case. I just couldn't get it working right and figured it was all gummed up inside so I put it aside and broke out the foam rollers.
Things progressed much faster now. I got trough the remainder of the port side and the entire stbd side in about an hour and a half.
There was just enough paint left in the tray to put another coat on the transom. Tomorrow I'll hit the keel & bottom panels. I hope to get at least two coats on them. This stuff is dry to the touch in 2 hours so timing should work out really well. I'll put anti fouling only on the bottom of the keel. That's all that'll be needed before I flip this thing over.

Nice bum!
I took some video of the spray painting. I don't know how it turned out. I might have a look at that later and put something together.

Standby....